
Looking at creating a Revit Template to speed up new projects? Here are 5 great tips on what you should do when creating your companies Revit template file.
Before we get started firstly let me explain what a Revit Template file is for those who do not yet know…
Whilst you’re here, you may find these two great articles useful where I show you how to create the template file and also how to add your company template to the Revit template list…
How To Customise Your Revit Templates List
What Is A Template?
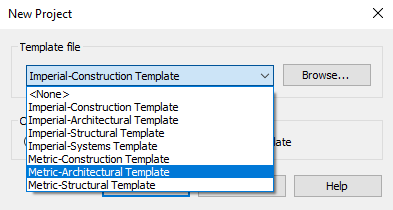
When you start a new Revit project most likely it will be based on a template. Revit comes with several templates pre-installed ranging from Architectural Templates to Structural Templates. These template files are the starting points of your projects and are designed to save you time setting up a new project.
You can have as many different templates as you like, you’re not limited to just one company template. If you work on different types or projects, whether its different disciplines such as plumbing or architectural or even if it’s by purpose such as commercial or residential, you are free to set up your templates how you wish.
5 Great Tips On Creating A Revit Template
Here we go, 5 great tips to get you started on creating your Revit template…
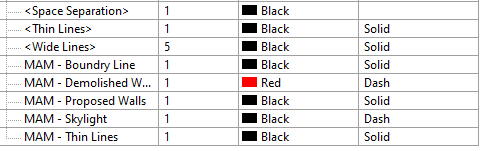
Naming Conventions
Having a naming convention in Revit is a great way to organise everything from Views to Families. You are going to want to think about adding a prefix to almost everything you can control the name of. This could simply be an abbreviation of your companies name, for example Man and Machine could be “MAM”.
The first and most obvious benefit to this is it makes spotting unapproved content or content which has accidently been imported into a project stick out like a sore thumb. If all you line types start with MAM then anything which has hitched a ride into your project (common with DWGs) is easy to spot and remove.
Naming views will help organise them in the project browser such as 001-Ground Floor & 002-First Floor will list them in order otherwise First Floor would list before Ground Floor.
Also naming all your Families with a prefix will allow you to easily identify approved content from anything which someone has just downloaded off the internet.
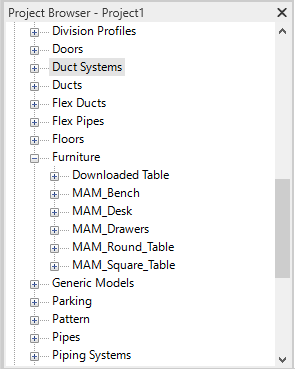
Families
Loading all the families you use on your projects into your company template will save you a bunch of time compared to individually loading them in every time you use them. This also includes system families such as line styles, text, walls & piping which have to be setup in a project so get those bad boys ready to go in your template.
However you have to be careful about bloating the file size of your projects. If you load everything into the template the file size could be that of a populated project before you have even started work on it.
My personal recommendation is that if you use something on at least 50% of your projects then it should be loaded into the template. Anything you use less than that just load it in if and when it is needed.
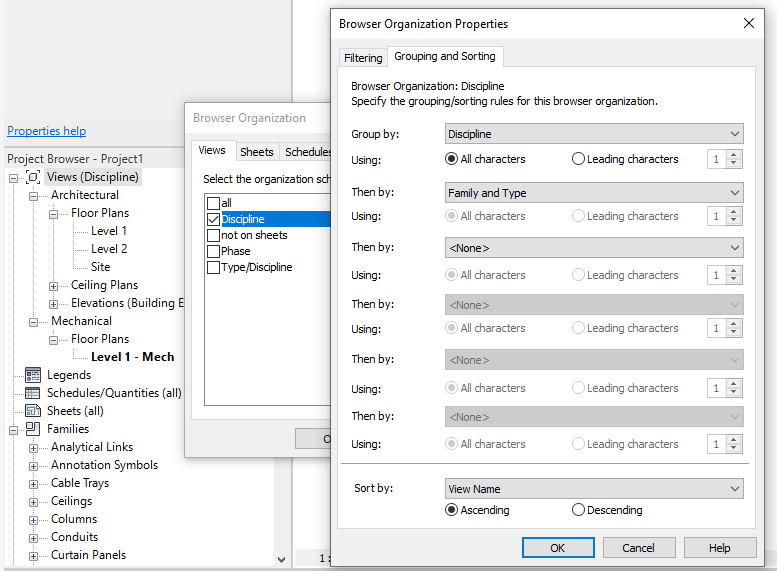
Project Browser Organisation
Did you know you can customise how your views, schedules and sheets are filtered and organised? Using the Browser Organisation tool you can customise how the Project Browser organises all of these.
Common methods of organisation of views for example will be WIP to only show views which are work in progress and haven’t been placed on a sheet, or by discipline so views are grouped on whether they are architectural, structural or mechanical.
You could even go as far as creating your own project parameters so you can filter and organise views based on your own organisations requirements such as planning stage or even by team.
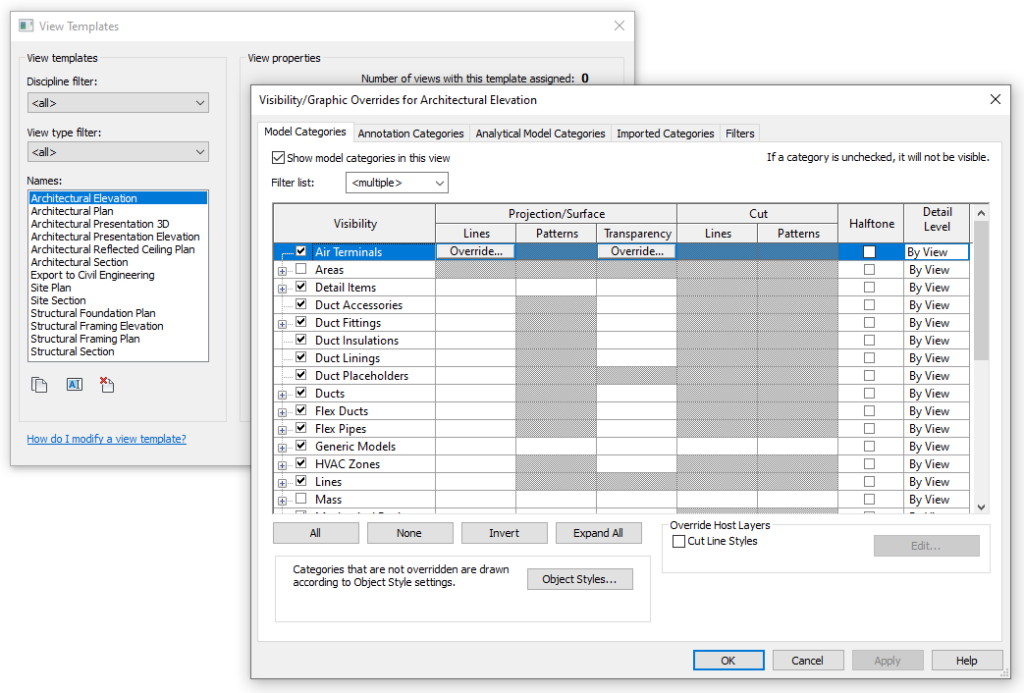
View Templates
You are going to have views which require the same visibility settings as another view. For example the room layout plan for the ground floor is going to need the same settings as the room layout plan for the first floor.
By using a view template we can setup how we want certain types of views to appear once and in one place then apply those settings to the required views, saving us time.
In all likelihood this will be the same across projects, by having the view templates setup as part of a company template it saves us configuring the same settings repeatedly.
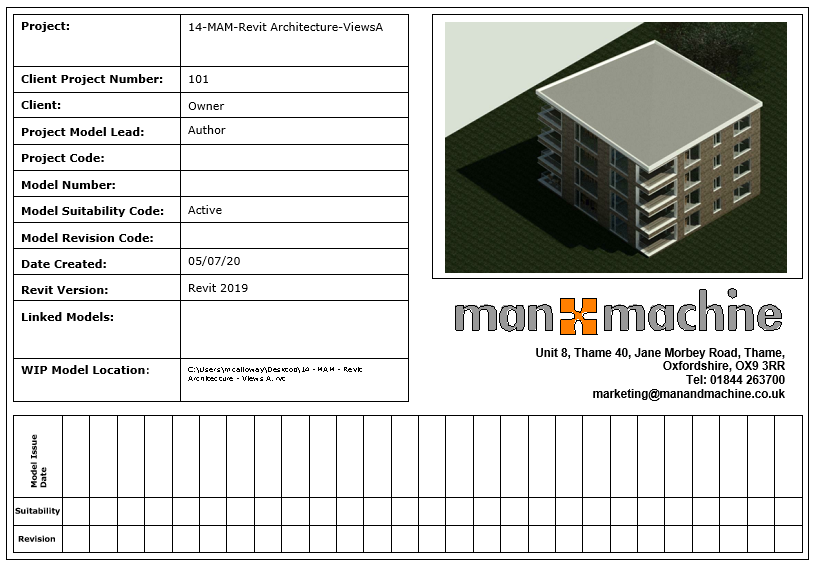
Starting View
This isn’t a big one but is a great feature to have on any project.
Revit is setup by default to open a project up in the last view which was open when the project was saved, this could be floorplan, schedules or sheet for example.
Having a sheet setup as a project cover with all the project details, your company logo and maybe a nice 3D render which Revit automatically opens up on, just adds that bit of polish and professionalism to the project.
Conclusion
Everyone should have a custom Revit template if you plan on ever creating more than one project.
There is so much more you can do with your template to save time, more than just the 5 examples listed above, think about Title Blocks, Sheets, Phases, Schedules, Legends, the list goes on.
More information can be found on Project Templates on the Autodesk Knowledge Network.
Still got Questions?
Book Training
Our Revit courses cover everything from the skills required to use the software, to design and share information between project teams, through to creating custom family elements.
Contact Us
We are here to ensure you receive a consistently high service and quality solutions for your business needs. We promise you won’t regret speaking to us, and if we can’t help you, we will try to find someone that can.