
Did you know that within Revit you can create a splash screen or specified view to be displayed when a project is opened? Also if you want to speed up the opening of projects, creating a project splash screen can save Revit having to generate a 3D view when a project is opened.
How to specify the starting view
By default Revit will use the last view that was open when the project was closed as the starting view. In the following instructions I will show you how you can create a custom starting view for your project and how to set Revit to use it when your project is opened.
1. Firstly make sure you have a view or sheet that you want to set as your splash screen. In this example I have created a new sheet called Splash Screen.
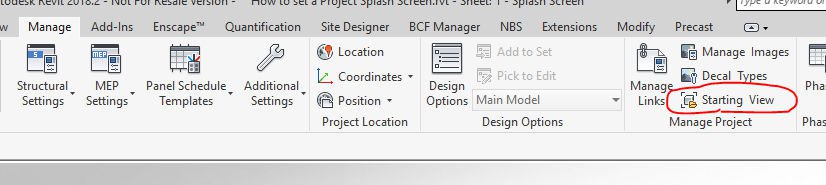
2. Once you have created the view/sheet to use, go to the manage tab on the ribbon bar and under the section “Manage Project” click on “Starting Views”
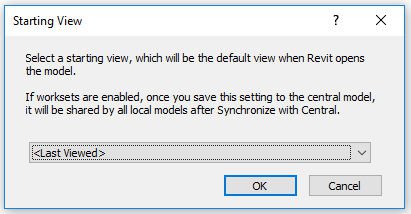
3. This will open a window with a drop down menu of all the eligible views and sheets which you can set as your starting view. By default you will see “<Last Viewed>” as the current selection
4. After selecting your view, click OK and then save your project. Revit will now always open the specified view when you open this project.
Conclusion
This isn’t a very well known feature in Revit and can add a level of professionalism if you are sending projects to other teams or other companies. Also opening a project on a 3D view, particularly if it’s a large site, can take time. Setting a starting view to something less taxing to open is an easy way to speed up opening a project.
Still got Questions?
Book Training
Our Revit courses cover everything from the skills required to use the software, to design and share information between project teams, through to creating custom family elements.
Contact Us
We are here to ensure you receive a consistently high service and quality solutions for your business needs. We promise you won’t regret speaking to us, and if we can’t help you, we will try to find someone that can.