
The Quick Access toolbar in Revit is a very useful space which allows you to add any function from the Ribon bar so that it is ever only one click away.
By default the Quick Access toolbar contains useful tools such as Undo & Redo, Save, New and Print however we can add our own buttons.
So how do we go about customising the Quick Access toolbar?
Add & Removing Tools
First of all we are going to want to add our favorite tools into the Quick Access toolbar.
To do this:
- Find the button for the tool in the Revit Ribbon bar.
- Right click on the Button for the tool.
- Select from the context menu “Add to Quick Access Toolbar”
This will add a copy of the tool to the end of the Quick Access toolbar.
Similiarly to remove a button from the Quick Access toolbar we right click on the button to remove and select “Remove From Quick Access Toolbar”
Organising the Quick Access Toolbar
Once we have all our favorite tools added into the Quick Access toolbar we are going to want to organise it, by default Revit will simply place any added buttons to the end of the toolbar.
To do this we need to access the Customise Quick Access Toolbar window.
- At the right end of the Quick Access toolbar is a dropdown button which looks like a horizontal line with a black triangle below it.
- Clicking this will present a menu, at the bottom will be the option to “Customise Quick Access Toolbar”.

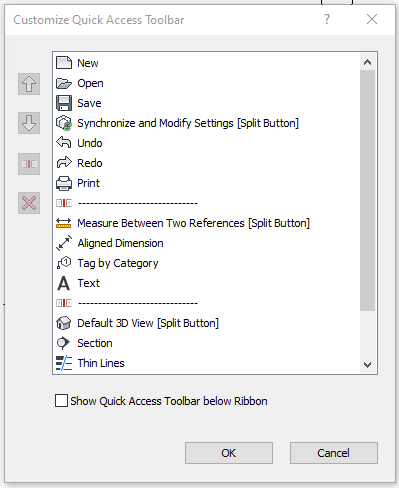
This will then open the Customise Quick Access Toolbar window.
Here we see a list of all the buttons in the toolbar, to the left we have four buttons.
The first two look like arrows and are used to rearrange the order of the buttons.
The third one adds a separator line so that you can group together buttons.
The fourth and final button is delete and will remove buttons from the list.
Conclusion
The Quick Access toolbar is a powerful time saving feature if you can spend a few minutes setting it up. If you work out which tools you use the most and add them to the toolbar it will over time save alot of effort on your part.
Still got Questions?
Book Training
Our Revit courses cover everything from the skills required to use the software, to design and share information between project teams, through to creating custom family elements.
Contact Us
We are here to ensure you receive a consistently high service and quality solutions for your business needs. We promise you won’t regret speaking to us, and if we can’t help you, we will try to find someone that can.