
Autodesk Vault is a data management software solution that is used by businesses in various industries, to manage their product design, engineering, and sometimes office data. It allows users to create, manage, and share digital designs, documents, and files in a secure and version-controlled environment. One of the key features of Autodesk Vault is its ability to manage who has access to what data and when, which is critical for ensuring the confidentiality, integrity, and availability of your data.
This blog will explore Access Control Lists in Autodesk vault, their benefits, and how they can be implemented.
What are Access Control Lists
Access Control Lists (ACLs) are an important feature of Autodesk Vault, a data management software that helps organizations manage their design and engineering data more efficiently. The access control capabilities of Autodesk Vault allow administrators to control who has access to specific files and folders in the Vault. Access Control Lists (ACLs) are a fundamental aspect of this access control system, and they play a crucial role in ensuring that users have the right level of access to the files they need.
In Autodesk Vault there are three types of Access Control Lists: Folder-level ACLs, File-level ACLs, and Lifecycle ACLs. Folder Level ACLs allow an Administrator or user with the correct permissions to assign a list of users and groups with access to specific folders in the vault. These lists can then be propagated to sub-folders within that folder if desired. Access Control Lists help to improve security in Autodesk Vault. By controlling access to specific files and folders, administrators can prevent unauthorized users from accessing sensitive or confidential data. This is particularly important for organizations that work with proprietary or confidential information, such as those in defence and aerospace.
Creating ACLs for Folders, Files and Items
- Open Autodesk Vault and navigate to the folder/file you wish to set up access control for.
- Right-click on the folder/file and select “Details” from the context menu.
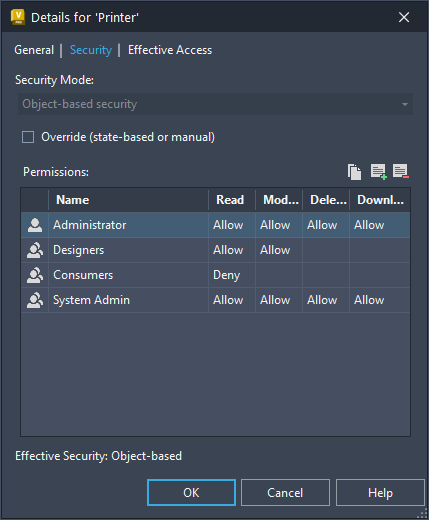
- Click on the “Security” tab in the Details dialogue box.
- Click on the “Add Members” button to add a new access control entry.

- In the “Add Members” dialogue box, select the user or group you wish to grant access to from the “User or Group” dropdown list.
- In the “Permissions” section, select the permissions you wish to grant to the user or group. You can select from a variety of permissions, including “Read,” “Modify,” “Delete,” and “Download.”
- Click “OK” to save the access control entry.
- Repeat steps 4-7 for each user or group you wish to grant access to.
- If you wish to remove an access control entry, select it from the list and click the “Remove” button.

- Once you have set up the access control entries, click “OK” to save the changes to the folder properties.
Lifecycle-Based ACLs
Lifecycle-based ACLs can help Administrators manage access control more effectively by ensuring that users have the appropriate level of access at each state of the lifecycle. For example, during the Work in Progress state, only certain users may have access to a file, while during the For Review state, additional users may be granted access. By defining permissions based on the state of the lifecycle, administrators can ensure that users have the access they need to perform their job when they need it, while also maintaining security and control over sensitive data.
Using Lifecycle-Based ACLs
Setting up Lifecycle-based ACLs in Autodesk Vault is a little more complex and only usually done by an administrator as it is part of setting up the lifecycle.
More can be found on creating lifecycles here: https://help.autodesk.com/view/VAULT/2023/ENU/?guid=GUID-8318AC6B-C52C-4C37-8BE2-FA3F37786FEE
For this guide, I am not going to be covering any of the other lifecycle setups. so I am basing this guide on that already having been done.
- Navigate to the Vault Settings Dialogue box by clicking Tools -> Administration -> Vault Settings
- In the Vault Settings Dialogue box click on the Behaviours Tab at the top of the menu
- Click on Lifecycles
- Select the Lifecycle you wish to add/modify Security on
- Click Edit at the top of the window (This will open a new window where you can modify the settings)
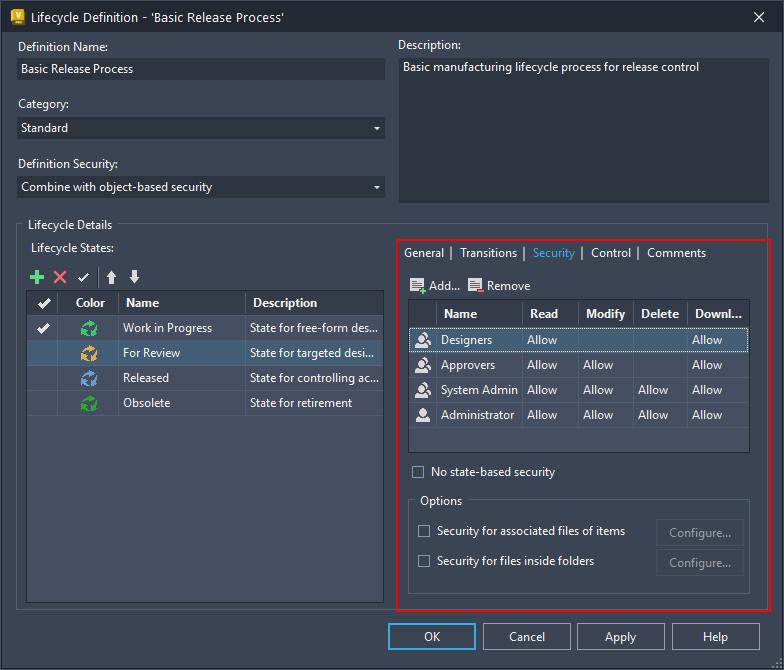
- On the left of the window select the state you wish to add/modify Security on (Like For Review in the example above)
- On the right of the menu select the Security Tab. This is the Access Control for this state that we want to modify
- Click on Add
- Add any Groups or users that you wish to control to the Current members of the Add Members form then click OK
- In the “Permissions” section, select the permissions you wish to grant to the user or group. You can select from a variety of permissions, including “Read,” “Modify,” “Delete,” and “Download.”
- Repeat steps 6-10 for each State you wish to create/modify Access Control Lists for.
In conclusion, Access Control Lists are a crucial feature of Autodesk Vault, enabling administrators to control who has access to specific files and folders in the Vault. By defining permissions at the file and folder level, administrators can ensure that users have the right level of access to the files they need, while also improving security and simplifying the process of managing access control. Access Control Lists also provide a useful method of controlling access to files at various states of a lifecycle.
Still got Questions?
Book Training
With our Autodesk Vault training you will learn to consolidate and organise all product information securely for easy reference, sharing and re-use. Make sure you contact us to find out which course is right for you.
Contact Us
We are here to ensure you receive a consistently high service and quality solutions for your business needs. We promise you won’t regret speaking to us, and if we can’t help you, we will try to find someone that can.