
Perhaps one of the most powerful yet underused features of Revit, Worksets facilitate collaboration with your wider design team
Defining Worksharing
Worksharing is a design process that allows multiple team members to work on the same Revit project model at the same time. Team members share a “central model”, and dividing Revit projects into worksets can help to accommodate the collaborative, multi-user environment. The central model stores the current ownership information for all worksets and elements in the project. This ensures that only one member is allowed to be editing a particular part of the model at one time.
Defining Worksets
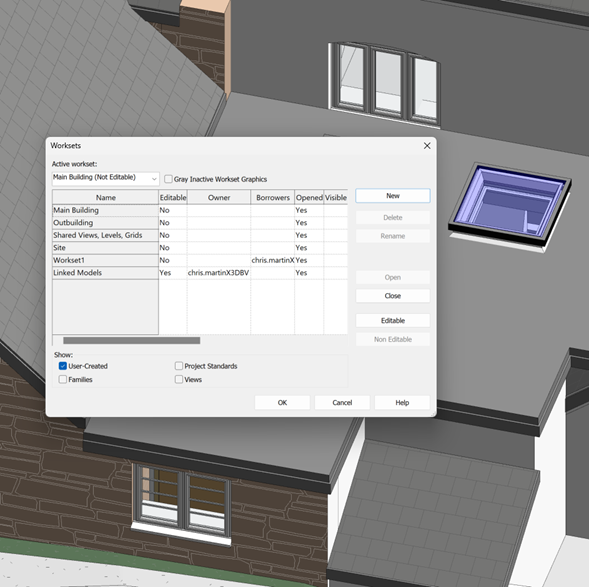
Worksets contain groups of user-defined elements, usually based on functional areas. For Architecture, this may be split into building elements, interior elements and site topography, or if multiple people are working on a large interior – more location-based, zoned worksets will likely be required. If you have Structural and MEP Engineers collaborating directly on the same file, you will likely want to have separate worksets for them, too. If they are working on separate files which are then linked into your model, you will likely want to have at least a “Linked Files” workset. This allows you to be able to control these files separately from your main model.
Workset Top Tips
It is important to be able to distinguish between making a Workset Editable and Borrowing an Element.
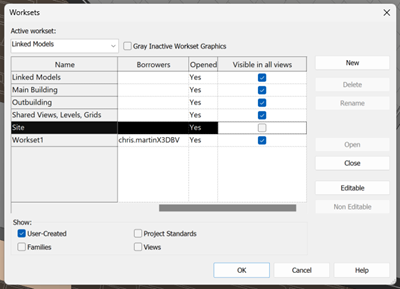
- When you make a workset editable in Revit, you are taking exclusive ownership of all objects in it. Only one user can exclusively edit each workset at a given time. All team members can view worksets owned by other team members, but they cannot always make changes to them.
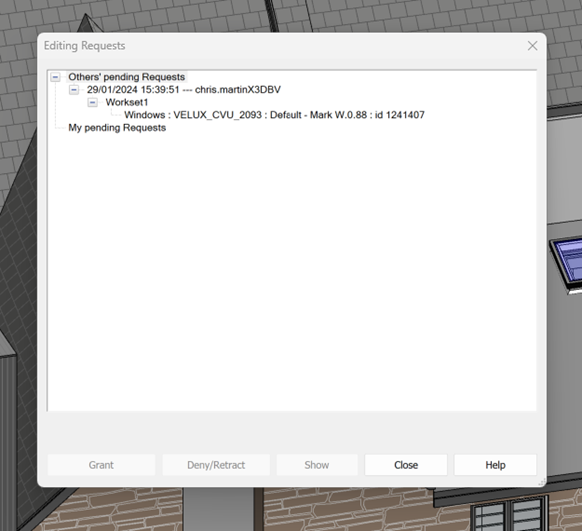
- Borrowing from a workset involves editing a specific element from a Workset that is not editable. In this case, either you do not have permission or someone else has taken ownership of it. To borrow an element from a workset that you do not own, you are required to obtain permission from the owner of that workset, or from the central file. The owner can then choose to grant or deny permission in the Editing Requests dialogue box. It is then required for the requester to synchronize the model to relinquish the element/workset.
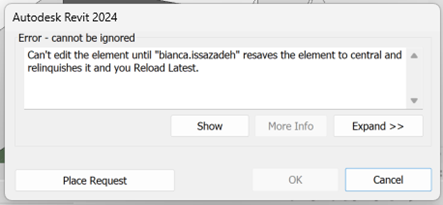
you will be required to request editing rights from that user
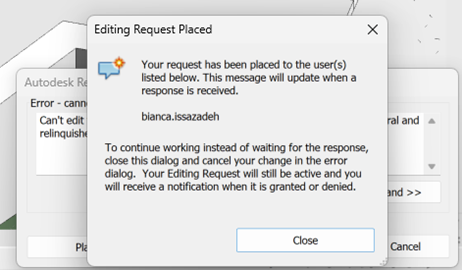
the latest model must then be reloaded to work on the requested element

- Making a workset ‘Not Editable’ does not stop the elements within that workset from being changed; it just means that the owner does not have exclusive editing permissions to that workset.
Worksets are not layers
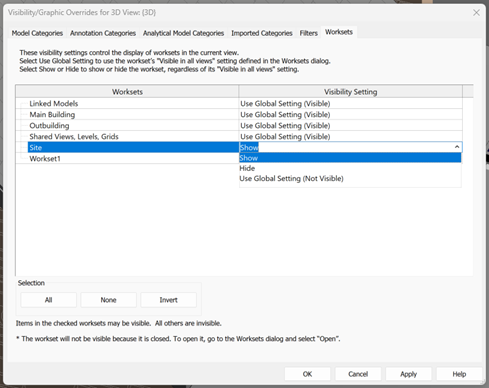
- Worksets should not be treated like “layers” in AutoCAD – they are to be primarily used to manage ownership of elements and controlling who can edit them, to prevent conflicts within the project. Although they have the ability to be able to manage visibility, this should be their secondary function. Many BIM Managers and Coordinators would recommend that Worksets are never used to control visibility.
- Using the ‘Visible in all views’ column can be useful for controlling overall visibility. For example, a workset that you may only want to show on a few views could be unchecked by default, and then overridden in Visibility Graphics > Worksets for a few specific View Templates.
‘Visible in all views’
- You can also Open and Close Worksets to make them visible or not visible on your local model. Turning off worksets when you are not using them can help with design accuracy. It will also allow Revit to work more smoothly by saving memory when working on larger projects.
Collaborating using Worksharing
Collaboration methods such as worksharing are initiated by selecting Collaborate tab > Collaborate. The process is managed either within a local (file-based) or wide area (server-based) network (LAN or WAN), or in the cloud (BIM Collaborate Pro feature only). All methods allow team members to work on a design concurrently, but collaborating in the cloud allows for teams to connect their project to the Autodesk Construction Cloud (ACC). The ACC suite of programs provide powerful design collaboration and coordination tools at every stage of the construction process.

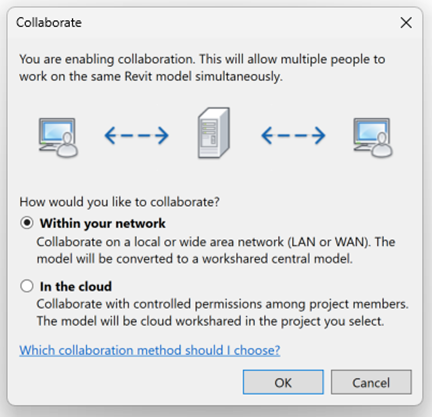

members to work on the same Revit files concurrently. Users can also
leverage this process using the Autodesk Construction Cloud.
Still got Questions?
Book Training
Our Revit courses cover everything from the skills required to use the software, to design and share information between project teams, through to creating custom family elements.
Contact Us
We are here to ensure you receive a consistently high service and quality solutions for your business needs. We promise you won’t regret speaking to us, and if we can’t help you, we will try to find someone that can.