
I often get asked why a Revit model isn’t behaving as it should or it’s running slower than expected, and one of the first questions I tend to ask is, have you checked your warnings and how many of them are there? This blog might help with some of those pesky pop ups and why you shouldn’t just ignore them. First, you need to know where to find the warnings dialogue if you aren’t immediately being told of an issue. This can be found on the far right of the Manage tab in any version of Revit:

Once you have this dialogue open you can do several things to audit your file and start to fix those issues! Your warnings will be grouped by type and will typically illustrate one or more elements which are affected by a warning group. Initially navigate to the last warning group and open the ‘+’ button to see how many warnings exist in your project. This will give you a total number of warnings which should be eliminated wherever possible.
You can also export the warning list to a html report file which can then be reviewed outside of Revit. Sometimes this can be useful if you are auditing someone else’s model to feed back to the author.
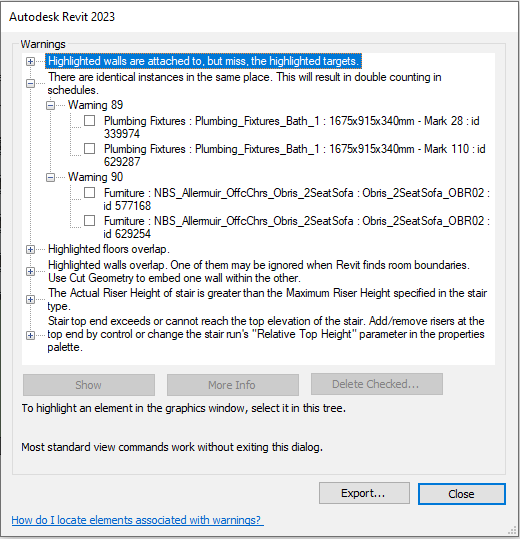
The other thing to note is that each element listed under a warning has a tick box adjacent to it and a Revit ID number at the end e.g. Warning 89 above has two elements with IDs 339974 and 629287. These tags can be used to find and isolate individual elements in a model by using the Select by ID tool above the warnings button on the ribbon. This is a handy tool if you need to visually work out what elements need to be reviewed to select and locate individual items.
The core function of the warnings is to give you an automated list of what may be causing you an issue in a model and periodically, it is a good idea to try and clear these warnings to both make your model run better and reduce potential errors, duplication or general problems in your model. As models get larger this can become a mammoth task if left to the end of a project and you have a requirement to provide a warning free model at handover.
Typical Warning Meanings
There are several warning type groups, and some are easier to remove than others. To get you started we have provided some of the typical warning categories and what to look for to eliminate them from your project:
- Multiple Rooms are in the same enclosed region – two or more room objects are captured in the same area. Remove or move additional rooms to clear the warning. This might happen when you have small room spaces with the tags in the wrong place. Using leader lines on room tags can help or subdividing rooms in to separate spaces using room separator lines.
- There are identical instances in the same place – you have element double counting which might cause you issues on quantity scheduling. Remove the additional items to clear the warning.
- Elements have duplicate ‘Mark’ or ‘Type Mark’ values – look at the parameters for these objects and this can be often easily fixed within a schedule to see where the same values are used. The warning can be cleared when elements have unique values.
- Walls/Roof/Floors Overlap – you may find this causes problems with joining geometry, rooms boundaries and a variety of other issues. Isolate the offending elements and try to resolve the overlapping issues.
- Inserts conflict with walls – normally occurs when a window or door conflicts with a wall that it is not placed within. To fix either move the door/window or the wall to remove the conflict.
- Stair Top exceeds or cannot reach the top elevation of the stair – look at the calculation/design for the stair for both number of risers and top and bottom placement to ensure the rules for the stair and desired number of treads meets the actual design of the staircase. Sometime these can be quite complicated to resolve.
- Walls are slightly off axis and may cause inaccuracies – probably one of the most annoying warnings especially when you are not drawing a square 90 degree orientation project. It can occur if you have modelled walls from an underlaying DWG-file which is not as straight as Revit would prefer, or when you have rotated the project against such a line. It can also occur when you join to walls that were almost inline and out of line by fractions of a degree. You can generally fix this by redrawing or re-snapping the wall to Revit orientation snap, align to another Revit object drawn or removing the object and creating a new one.
There are many more but hopefully this starts to troubleshoot potential stability issues you might be having with your models and help to meet the needs of your model handover requirements.
Should you require further details on Revit training or learning more about the features of Revit 2023, please contact the team at Man and Machine for further help.
Still got Questions?
Book Training
Our Revit courses cover everything from the skills required to use the software, to design and share information between project teams, through to creating custom family elements.
Contact Us
We are here to ensure you receive a consistently high service and quality solutions for your business needs. We promise you won’t regret speaking to us, and if we can’t help you, we will try to find someone that can.