


I’m coming across too many users who have performance issues when using AutoCAD Civil 3D. In every case, the issue is not because Civil 3D itself has any issues, it’s always because the computer is under-specified for the task, not set up correctly or the user is not working in an efficient way. So I would like to address this in this blog by covering some basics that every user should do before embarking on a day of civil engineering with AutoCAD Civil 3D. Most of these will apply to everyone who uses a computer for whatever reason. The 3 questions I always ask are:
- Are you using the right hardware?
- Is your very expensive hardware set up correctly?
- Are you using the software efficiently?
Hardware
It’s very important that whoever is responsible for your hardware understands the system requirements. Send them to this site: System Requirements | Autodesk Support.
Do not, I repat, do NOT work to the minimum specifications. There are 2 problems with this. Minimum means just that, if you have anything other than a small job that requires very little work, minimum is not enough. Secondly, you would expect your hardware to last more than a year. What will minimum look like in 3 years? I think we can all agree the requirements goes up most years.
The headline figures are:
- 3GHz processor (AutoCAD mostly uses one processor at a time).
- 32GB RAM (CAD drawings are hungry as everything is loaded into memory).
- 8GB dedicated graphics card (AutoCAD relies heavily on graphics).
In this case, bigger is always better. But now you have the right hardware, is it set up correctly?
Hardware Set Up
For Windows there are a couple of tricks you can use to speed up performance. Firstly hit the Windows key and type ‘Performance’.
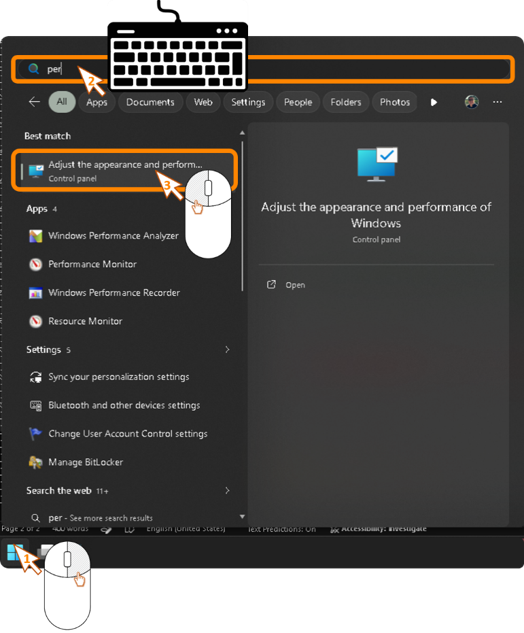
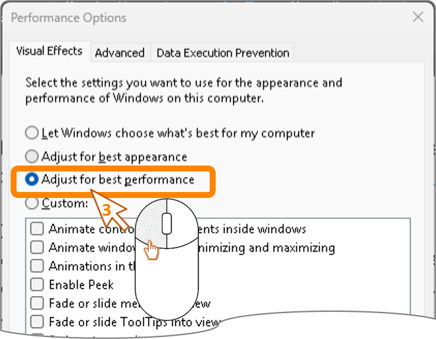
You are looking for ‘Adjust the appearance and performance of Windows’ and select ‘Adjust for best performance’. Why let Windows decide when you want better performance? You just want the best performance, all the time.
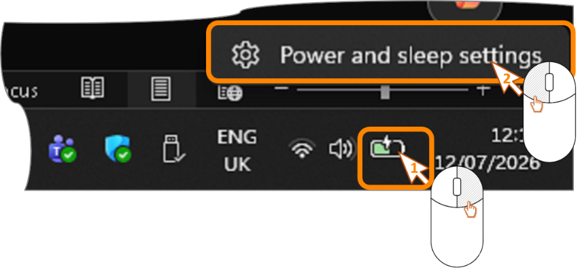
Next if you are using a laptop, make sure your power mode is also set up for the best performance. Right click your battery icon in the system tray (the bottom right of your Windows screen) and select ‘Power and sleep settings’.
Select ‘Power Mode’ and set to ‘Best Performance’.
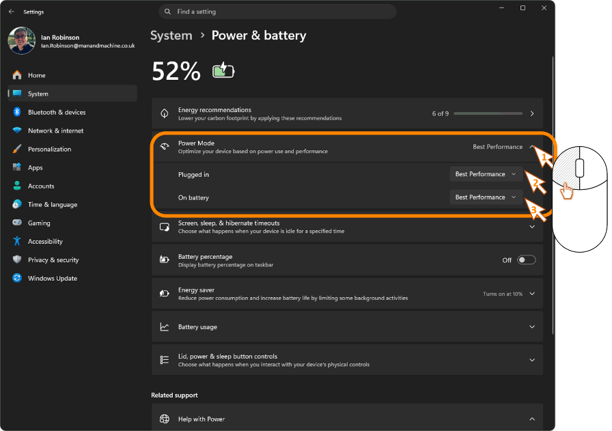
Of course, your battery life will fall off a cliff so it’s a judgement call as to whether you want to run Best Performance when on battery. I tend to unplug mu laptop as I move around the offices, so I leave mine on Best Performance.
Next, make sure your graphics cars has the correct drivers installed and they are set up correctly. When you install a dedicated graphics cars, some people disable the built in card in bios, but most don’t. I leave mine enables so the build in Intel Graphics can handle all the boring stuff like Outlook, Excel and Word etc, and my super-duper graphics cards can do all the exciting stuff like Civil 3D, Revit and Google Earth etc.
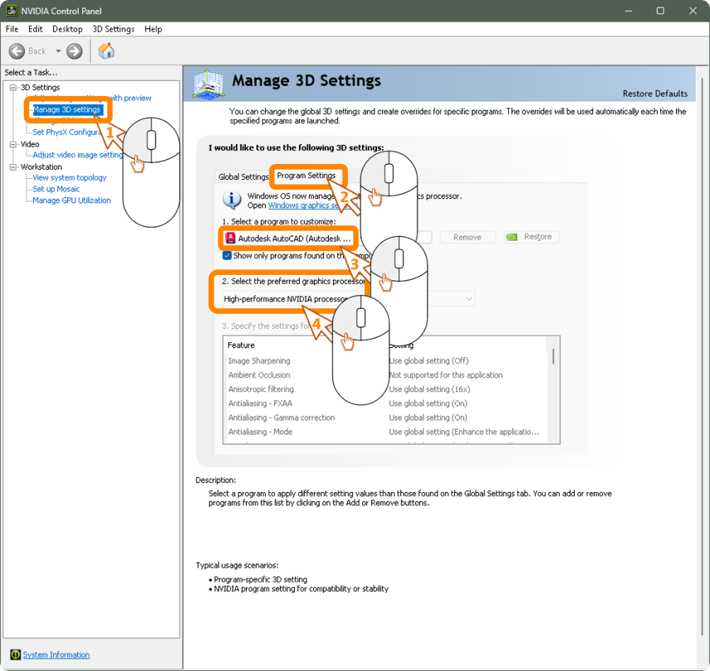
Use Windows to search for any graphics configuration software. For example, I have an NVIDIA graphics card installed, so I hit the Windows key again and type NVIDIA to see what comes up.
The NVIDIA control panel appears. Great, the drivers are installed. Now in the ‘Manage 3D Settings’ area, you can go to the ‘Program Settings’ tab, select ‘Autodesk AutoCAD’ and make sure it is using the ‘High Performance NVIDIA Processor’. Note that AutoCAD Civil 3D doesn’t appear in the list – all variants of AutoCAD use the AutoCAD.EXE program and Civil 3D is no exception, so use that one.
Now your Windows and graphics card is set up, let’s look at some of the tools available to you in a Civil project that will help with performance.
XREFs, DREFs and FDO
For larger projects and projects that are being worked on by multiple engineers, I know you are all aware of XREFs where you can reference CAD drawings and images into multiple drawings, making sure you are not duplicating data and any changes are tracked across all the drawings they are referenced to. This, of course, has some performance advantages, but if you are not using DREFs or ‘Data Shortcuts’ then you may be missing a trick.
DREfs allow you to share Surfaces, Alignments (and Profiles), Corridors, Pipe and Pressure Networks, Ponds, and View Frame Groups. Unlike XREFs, DREFs only share the data which means you can choose the style independently in each drawing it is referenced to.
A good example would be to create your Survey Surface and DREF it into every drawing that needs an existing ground. Someone designing roads might have the Existing Ground shown as Contours. The Hydrology Engineer might be using the surface to view levels and slow paths so sets the style to show heights and flow arrows. DREFs allow the same data to be shared, but each consumer of that data can choose how to use it.
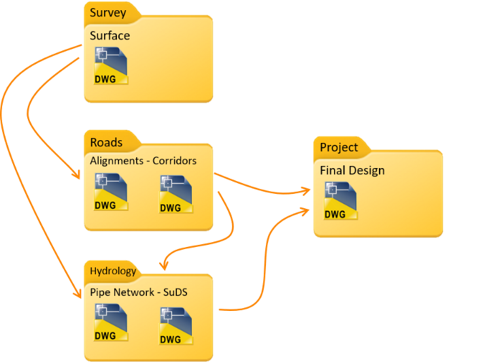
By splitting up your drawing into logical disciplines, you divide the workload your computer has to deal with.
You could also consider using GIS tools. Most projects have mapping data attached and many also have other GIS data requirements, for example flood data from the Environment agency.
Let’s take this example of a simple road project where we have to design a road with drainage. Rather than importing the data directly into the model multiple times, you could just connect to it using the FDO features built into Civil 3D.
With FDO you can connect to GIS data held by your organisation without duplicating the data. This will reduce errors caused by the underlying information being edited in multiple locations.
You can also connect directly to other organisations through Web Mapping Services. This ensures that the data you are looking at is the latest data available. It’s lost track of how many times I see engineers using out of date data.
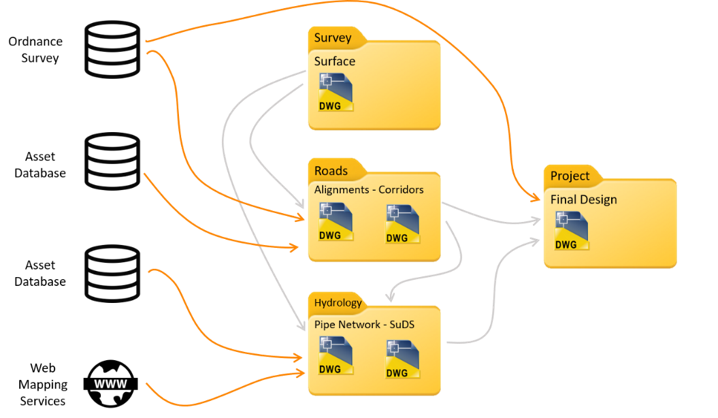
There are many other advantages to linking data through XREF, DREF and FDO which I will cover in more detail in later blogs.
To summarise, make sure your hardware is up to the job and configured correctly and be smart about how you generate your project data. This, does this information need to be shared? Who needs it? Does it need to be a live share, or a snapshot in time?
Still got Questions?
Book Training
Our Civil 3D training will teach everything you need for surveying, mapping, design, documentation and analysis. It’ is designed for Civil Engineers and Surveyors who want to take advantage of the software.
Contact Us
We are here to ensure you receive a consistently high service and quality solutions for your business needs. We promise you won’t regret speaking to us, and if we can’t help you, we will try to find someone that can.