Autodesk Inventor is an absolute joy to use, and can make 3D modelling feel just like Lego© for grown-ups. But once in a while, a default setting may be something you just can’t get used to. Or once you really get into the swing of things, you may wish to add your own shortcuts, and tweak your interface a little, for even more speed. This guide to making Inventor more user-friendly will demonstrate a few ways you can tweak your Inventor settings to maximise your productivity.
1. Change mouse-wheel zooming to be like AutoCAD
A common complaint from users that come from an AutoCAD background is that the zoom behaviour of the mouse-wheel in Inventor is inverted. By default, in Inventor, if you scroll down, you ‘pull’ the model towards yourself (i.e. you zoom in). However, in AutoCAD, the opposite is true; scrolling down will zoom out of the drawing.
If you don’t want to change your AutoCAD habits, you can change Inventor’s zoom behaviour to be like AutoCAD. Simply perform the following:Tools -> Application Options -> Display Tab -> Zoom Behaviour -> Tick ‘Reverse direction’.
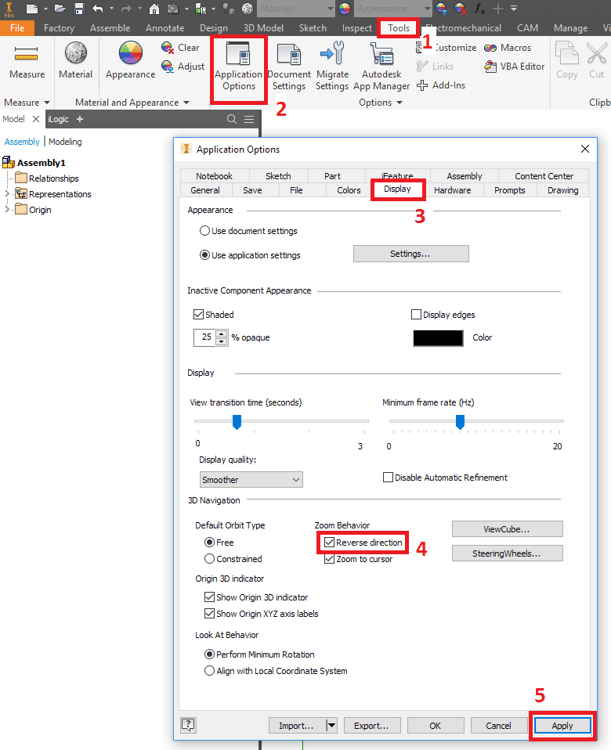
Now, the AutoCAD magic has made its way into Inventor.
2. Always show components with ‘Shaded with Edges’
Sometimes when we open parts or assemblies, we find that the visuals aren’t what we are used to: someone may have left the document in wireframe, or ‘realistic’ with shadows turned on. This can be infuriating when working with a large team, each with different viewing preferences.
The cause of this issue is that the viewing style is saved to the document itself, and Inventor will change its viewing style to match it by default. Luckily, however, this can be changed. It is possible to force Inventor to use the same visual style you specify when opening every document. To achieve this, simply perform the following:
Tools -> Application Options -> Display Tab -> Appearance -> Tick ‘Use application settings’
If you wish to configure the default visual style used, then you must continue, with:
Click ‘Settings…’ -> Configure the default visual style to your liking
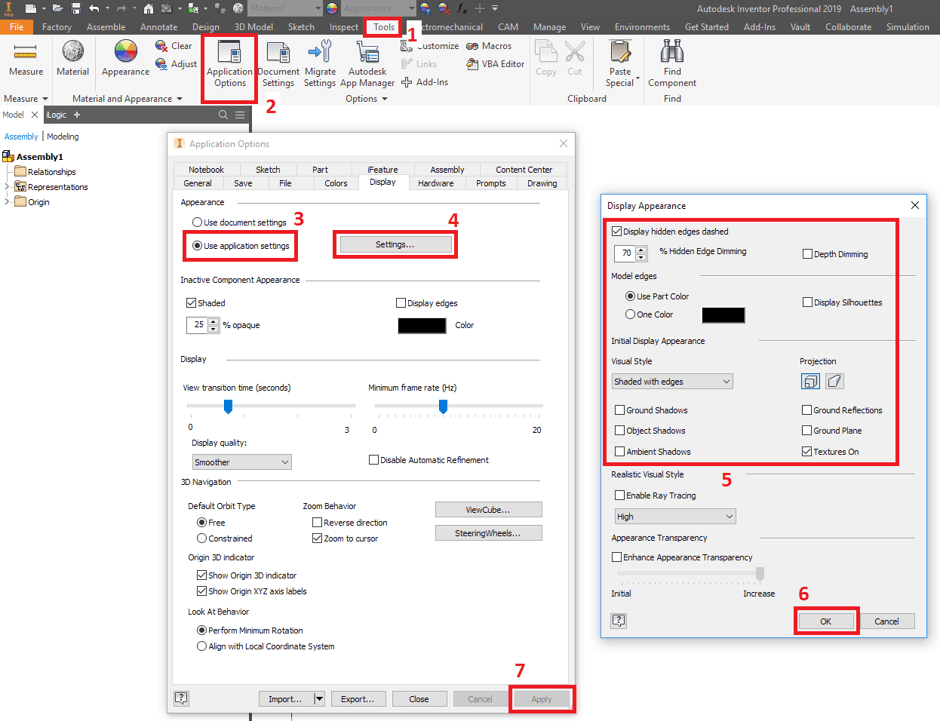
Ta-da! Now, all documents will open with this familiar style. Keep in mind however that you can still change the visual style of the document, and that other users (who have not done this) will see that change. Magic.
3. Get rid of the ‘My Home’ screen
If you don’t want to be assailed by the ‘My Home’ screen every time you boot up Inventor, it is possible to disable it entirely. To do this, simply perform the following:
Tools -> Application Options -> General Tab -> Untick ‘Show My Home on startup’
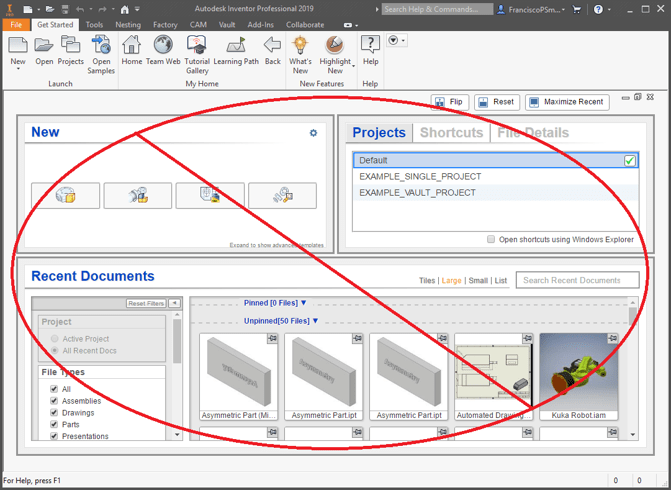
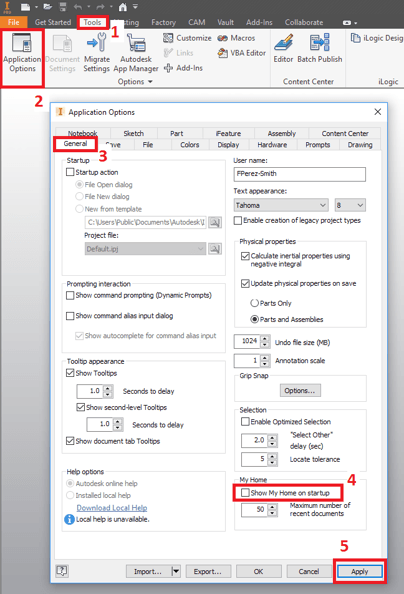
Now, your Inventor will start off with a blank slate. Wonderful!
4. Customising the Marking Menu
One of the most awesome and hidden customisations you can make in Inventor is in the Marking Menu. This is the menu that is summoned up when you right-click the mouse. The Marking Menu is highly contextual, and will change depending on your environment and sub-environment.
It is possible to not only configure the existing Marking Menu in its numerous contexts, but it is also possible to create your own – one that is summoned up when you hold Ctrl + Right-Click. To get achieve this incredible thing, simply perform the following:
Tools -> Customize -> Marking Menu Tab -> For each ‘Environment’, Select ‘Ctrl+Right Click Menu’ as the ‘Sub-Environment’ -> Configure your tools
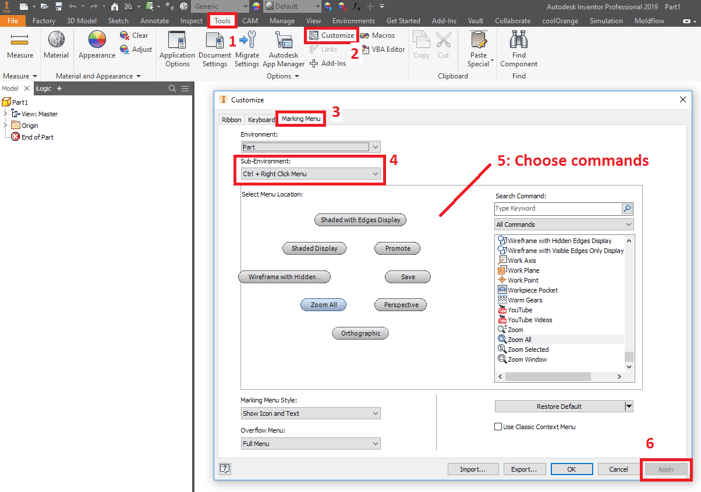
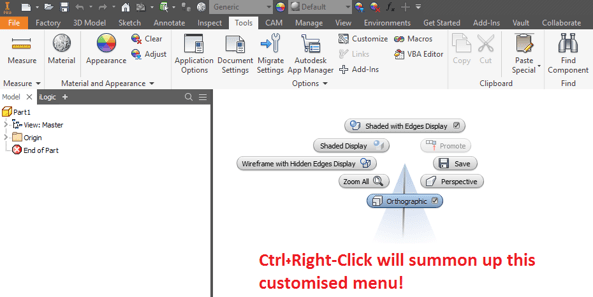
And just like that, you have your own customisable menu! What incredible power! What joy!
Conclusions
If you’d like to learn more on customising Inventor, or would like to take one of our master-classes, don’t hesitate to get in touch! Our professional trainers will have you up to speed in no time.
For more information on this blog post, or if you have any other questions/requirements, please complete the below form:
Related Links
Autodesk Inventor – Man and Machine
Autodesk Inventor Training – Man and Machine
Autodesk Inventor CAM Training – Man and Machine
Autodesk Product Design and Manufacturing Collection – Man and Machine
Inventor Training – Solid Modelling Introduction – Man and Machine
Autodesk Inventor – Autodesk Platinum Partner – Man and Machine