
If your drawings in AutoCAD look perfect in Model Space but become messy when printing, you’re not alone. This is one of the most common challenges that beginners face. The solution? Layouts (Paper Space).
In this blog, you’ll get a basic understanding on how to use Layouts in AutoCAD to create clean, properly scaled and professional-looking drawing sheets.
What are Layouts in AutoCAD?
AutoCAD provides two main workspaces:
- Model Space: where you can create your drawing at full scale (1:1).
- Layout Space (Paper Space): where you prepare your drawing for printing.
Why are Layouts important?
Using Layouts gives you full control over your drawing output. Instead of struggling with scaling and positioning, you can:
- Add title blocks.
- Control drawing scale accurately.
- Display multiple views on one sheet.
- Print with precision and consistency.
Without Layouts, printing often becomes trial and error. With Layouts, it becomes structures and reliable.
Navigating Layout Tabs
At the bottom of the AutoCAD interface, you’ll find:
- Model tab.
- Layouts tab (eg, Layout1, Layout2).

You can manage these easily:
- Rename Layouts (eg, Floor Plan).
- Create new Layouts for different sheets.
- Delete unused Layouts.
This helps keep your project organised, especially when working on multiple drawings.
Setting Up a Layout
Before adding your drawing, you need to configure the layout settings.
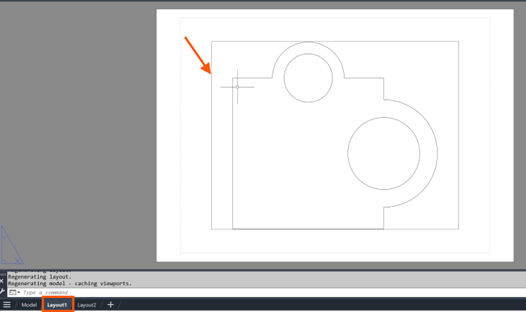
However, before I go on to explain Layout settings and what a viewport is, by default when you select either Layout1 or Layout2, you will need to delete the viewport automatically shown on the layout by selecting the edge of the rectangle representing the viewport.
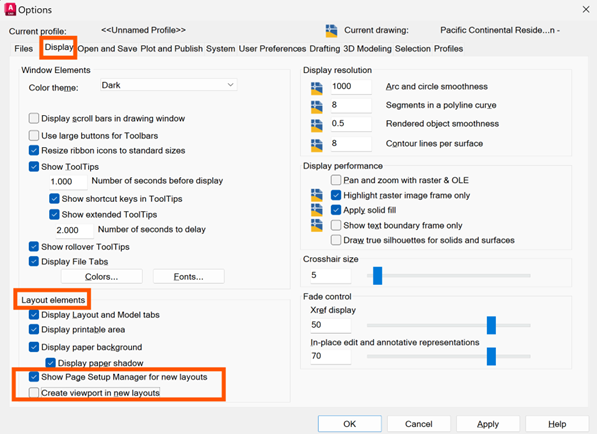
To prevent this for new Layouts:
- Go to Options.
- Type OP and enter, under Display > Layout Elements.
- Change the last 2 tick boxes to match the below image.
Now we can dive into how to set up a Layout!
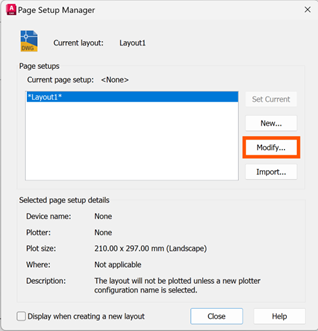
- Right-click on a Layout tab (Layout 1).
- Select Page Setup Manager.
- Click Modify.
Here you can define:
- Printer or plotter.
- Paper size (A4, A3 etc).
- Plot Area – Extends will allow you to select Centre the Plot.
- Orientation (portrait or landscape).
- Plot Style.
- Plot Scale – leave 1:1 (as we will add scale factors to the viewports).
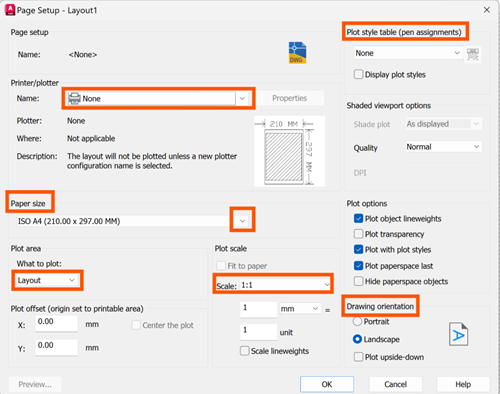
Always match the paper sized to your final output to avoid scaling issues later.
Now let’s look at creating Viewports!
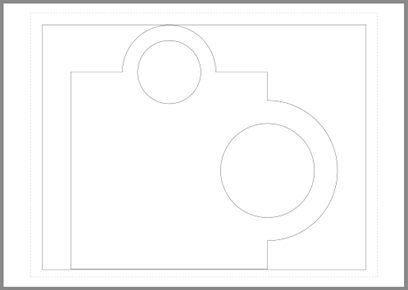
A Viewport is a window that displays your Model Space drawing inside the Layout.
How to create a Viewport:
- In the Layout tab (Layout 1), after you deleted the automatically placed viewport, select Layout and in Layout Viewport > Rectangular.
- Draw a rectangle on the sheet.

Your drawing will now appear inside this Viewport:
Setting the Correct Scale
This is one of the most important steps!
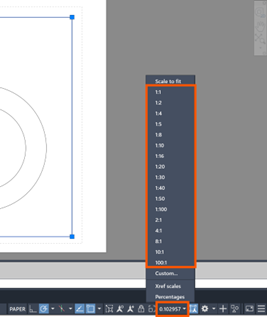
- Click the edge of the Viewport to activate it.
- Set the desired scale (eg, 1:100 or 1:50) at the bottom of the screen on the status bar.
- Adjust the view as needed by double-clicking inside the viewport. You can pan to position but do not zoom as you will alter the scale factor you have just applied. Do not draw anything here as this will add to the Model Space. Double-click outside the Viewport to ‘get out of’ or deactivate the Viewport.
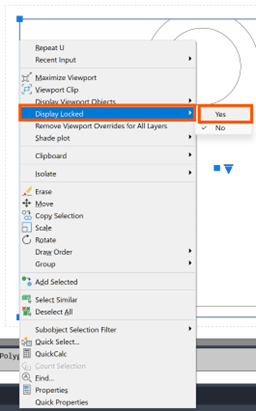
Once done, select the edge of the Viewport and right-click to Lock the Viewport to prevent accidental zooming or changes. This ensure your drawing stays at the correct scale.
If you have a title block already created, insert your title block directly in the Layout area (normally before adding a Viewport). You can also add multiple Viewports in a Layout with different scales and how to show Plan Views, Sections and Detailed Views.
Annotations are typically added in Paper Space, so they remain consistent in size regardless of viewport scale. Use a Text Style for paper space and a layer for this text. Unless you use annotative text (a subject for another time).
When your layout is ready, it’s time to print. Always use Print Preview before final printing to avoid errors.
Additional Tips:
- Use annotative scaling for better text control.
- Save Layouts at Templates for future projects.
- Use Layers to control visibility in different Viewports.
Layouts in AutoCAD are essential for creating professional, well organised drawings. Once you understand how to set up Layouts, use Viewports, control scale and add annotations, you’ll be able to produce clean and accurate sheets every time.
Still got Questions?
Book Training
With our range of AutoCAD courses we can teach you best-in-class 2D and 3D design skills. This includes drawing, taking measurements, producing templates and everything required to create your designs.
Contact Us
We are here to ensure you receive a consistently high service and quality solutions for your business needs. We promise you won’t regret speaking to us, and if we can’t help you, we will try to find someone that can.