
In the world of computer-aided design, detailing and presentation are just as important as drafting accuracy. One of the most essential tools that helps designers enhance drawings in AutoCAD is the Hatch command. Whether you are an architect, civil engineer, interior designer, or mechanical drafter, hatch patterns improve the readability and appearance of technical drawings.
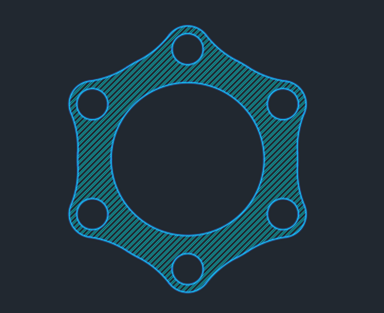
Hatching is used to fill enclosed areas with patterns, solid fills, gradients, or textures to represent materials, sections and visual distinctions within a drawing. From concrete walls and brick patterns to metal sections and wood textures, hatch patterns make drawings more professional and easier to interpret.
Let’s dive in!
Hatch is a feature that fills an enclosed area or selected objects with a predefined pattern, solid colour, gradient, or custom design. Hatching helps represent materials, sectional views, and different zones in technical drawings. For example:
- Brick walls can be shown with brick hatch patterns.
- Concrete areas can use concrete textures.
- Cross-hatching is used in sectional engineering drawings.
- Solid fills can highlight important regions.
The Hatch command improves both visualisation and communication in CAD drawings. Users can create custom hatch patterns for unique project requirements.
Start AutoCAD and either draw something up or open an existing drawing that require hatching, then follow the below simple steps to create a hatch.
Step 1 – Open the hatch command.
Under Home, in the Draw panel:
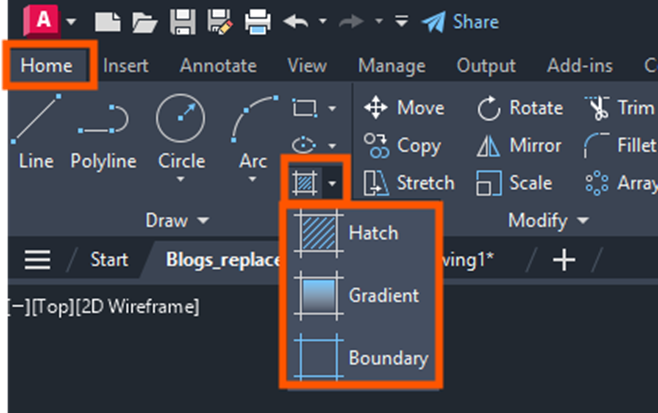
Or type HATCH in the command line pressing H.
This will change the ribbon to:

Step 2 – Select the boundary.
Select the internal area with Pick Points, or use select object to select the entire object to ignore the internal areas. The area must be completely enclosed.
Step 3 – Choose a pattern.
Select the pattern, then change the scale, angle to your desired output and follow the ribbon to see what you can do.
Step 4 – Apply the Hatch.
Close the Hatch Creation by selecting the green tick.
Hatch Editing Options
AutoCAD allows users to modify hatch properties after creation. Double click on the hatch to go back to the Hatch Editor ribbon.
Hatch Editor Features
- Change pattern type.
- Adjust scale.
- Rotate angle.
- Modify transparency.
- Add boundaries.
- Remove boundaries.
Associative Hatch vs Non-Associative Hatch
- Associative Hatch: Automatically updates when the boundary changes.
- Non-Associative Hatch: Does not update with boundary modifications.
Associative hatching is generally recommended for professional projects.
The Hatch feature in AutoCAD is an indispensable tool for creating professional and informative technical drawings. It not only improves the visual quality of designs, but also helps communicate material specifications and sectional details clearly.
From simple solid fills to advanced material pattern, hatching enhances the overall drafting workflow across architecture, engineering and design industries. By understanding hatch types, editing tools and best practices, users can significantly improve the quality and efficiency of their AutoCAD projects.
Whether you are a beginner learning CAD drafting or an experienced professional managing complex projects, mastering Hatch in AutoCAD is a valuable skill that contributes to precise and visually effective drawings.
Still got Questions?
Book Training
With our range of AutoCAD courses we can teach you best-in-class 2D and 3D design skills. This includes drawing, taking measurements, producing templates and everything required to create your designs.
Contact Us
We are here to ensure you receive a consistently high service and quality solutions for your business needs. We promise you won’t regret speaking to us, and if we can’t help you, we will try to find someone that can.