Saving a model file to the cloud (BIM360 Docs or Autodesk Docs) is straight forward as saving locally. We can save a model which can be used by an individual or workshared and used by multiple users directly from the cloud.
Saving a Non-Workshared Model
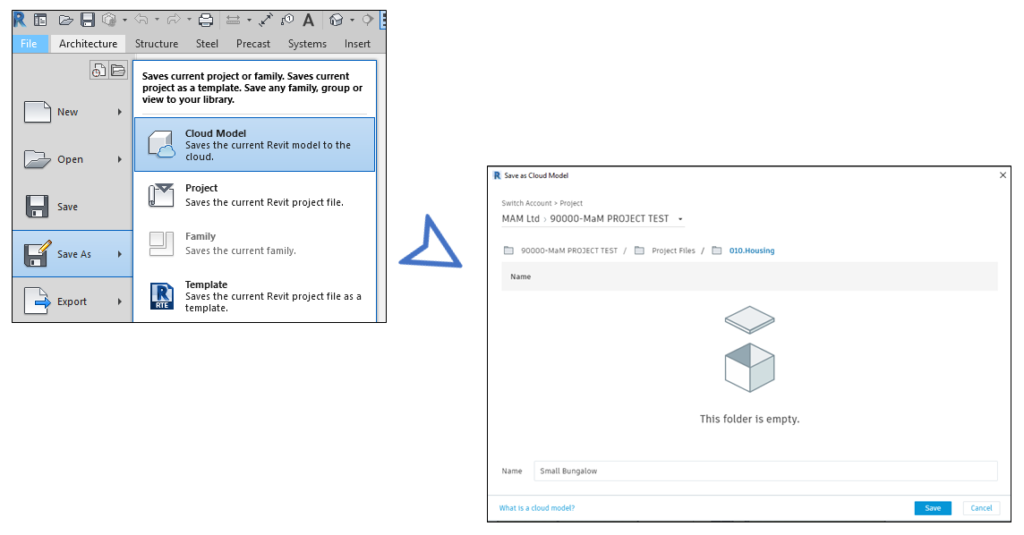
Following the similar steps to save your model locally but instead, on the Save As select Cloud Model. Then select the project and folder location of where you’d like to save the file. It is important to note this model can only be worked on by a single user and is a non-workshared model (as shown in figure 1).
When you save the model, it creates a copy but only locally and does not publish the next version in the cloud. To do this you need to select either BIM 360 or Autodesk Docs from Recent Files, then find the project and folder location where the model will be listed.
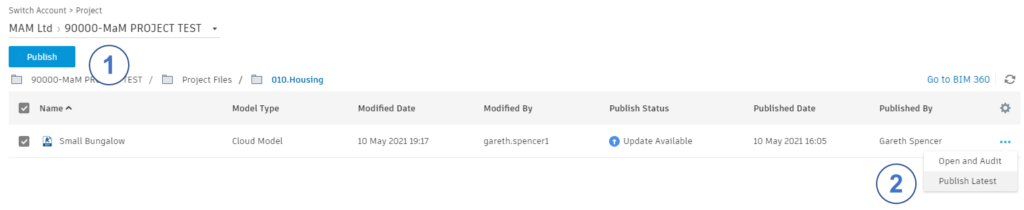
Either tick the box to left of the model and then select Publish (as show next to number 1) or select the three dots on the right-hand side and then select Publish Latest. A dialog box will appear asking if you would like to publish the latest version of the model to the cloud. This can take a few minutes depending on the model size (as shown in figure 2).
Note: If a Revit model file is uploaded directly to BIM 360 Docs or Autodesk Docs you won’t be able to open the model through Revit. So to work on the file directly through Revit you are required to save the model directly through Revit.
Saving a Workshared Model
If you wish to work on a workshared model then you have two ways to save a model to the cloud.
The first one is to follow the same step as noted above and save the model to the cloud project. Once you have done so you are now able to turn the model into a centralised model by selecting Collaborate (tab) > Manage Collaboration (panel) > Worksets to enable worksharing. There are a number of steps you will need to follow to enable this. In the Enable working dialog window you will need to tick the boxes and the select enable to proceed. Then setup your worksets and synchronize to central for the first time. Your model will become a workshared model ready for the team to start working collaboratively.
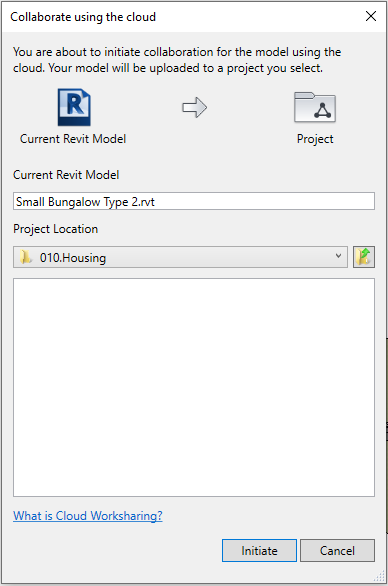
The second option allows you to use the Collaborate tool Collaborate (tab) > Manage Collaboration (panel) > Collaborate. You will need to make sure you select BIM 360 and not within your network. Then select the project and folder location and select Initiate (as shown in figure 3).
This will automatically start the worksharing process and save the file to the project location, so you are undertaking both save and worksharing at the same time.
The same applies when a model is updated and saved, you will still need to publish the file to the cloud.
This is part three of three saving your Revit model. Part one covers saving your model locally you can check it out here and part two covers workshared models which you can read here.
For more information on this blog post or if you have any other questions/requirements, please complete the below form:
Related Links
Autodesk Revit – Autodesk Platinum Partner | Man and Machine
Revit Training Courses – BIM Modelling Skills | Man and Machine
Revit Architecture Training – Platinum Partner | Man and Machine
Autodesk AEC Collection – Platinum Partners | Man and Machine