In this blog I will show you how to save a 3D view in Revit. These will be added to the project browser and can even be added onto sheets.
We can save a custom 3D View in just a couple of steps:
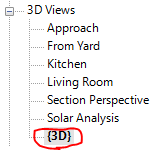
1.Go into 3D mode in Revit by double clicking {3D} in the project browser:
2. Orientate the model to the view in which you are wanting to save.
3. Once happy with the 3D view right click on the view cube to open the context menu:
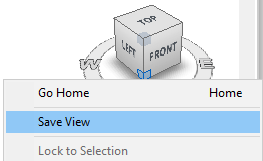
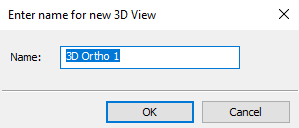
4. Select “Save View” and give your view a name
5. Your newly created 3D view should now be available in the project browser.
Once you have created a 3D view you may wish to lock it to stop it from accidentally being changed. You can do this with the Lock 3D View button in the visualisation menu at the bottom.
Conclusion
There are many ways to create 3D views in Revit and lots of options for changing the quality of the image. Here we can see how we can very quickly create a custom 3D view.
For more information on this blog post, or if you have any other questions/requirements, please complete the below form:
Related Links
Autodesk Revit – Man and Machine
Autodesk AEC Collection – Man and Machine
Autodesk Revit Training – Man and Machine
Autodesk Revit Demonstrations – Man and Machine
Autodesk Revit – Autodesk Platinum Partner – Man and Machine
Autodesk Revit LT – Autodesk Platinum Partner – Man and Machine
Autodesk Revit LT Suite – AutoCAD & Revit LT – Man and Machine
Revit Architecture Training – Platinum Partner – Man and Machine
Autodesk AEC Collection – Platinum Partners – Man and Machine